Blog 2.0

Cheese Dog Treat Recipes: 3 Easy & Delicious Homemade Treats for Your Pup

There’s nothing quite like the irresistible aroma of cheese, and guess what? Your dog agrees! Cheese is a favorite treat for many pups—it’s rich, creamy, and packed with protein and calcium. Making homemade cheese dog treats allows you to give your furry friend a healthy, preservative-free snack made with love.

In this blog post, we’ll share:
✔️ Why cheese is a great treat for dogs
✔️ Three easy cheese dog treat recipes
✔️ Storage and serving tips
✔️ Frequently asked questions about feeding cheese to dogs

So, grab your pup’s favorite cheese, and let’s get baking! 🧀🐶

Is Cheese Safe for Dogs?

Yes! Most dogs can safely enjoy cheese in moderation. It’s a good source of protein, calcium, and healthy fats, which support muscle growth, bone health, and energy levels. However, there are a few things to keep in mind:

1. Use Dog-Safe Cheese

Some cheeses are better than others for dogs. Here are the best options:
✔️ Cheddar – A classic favorite, high in protein and flavor.
✔️ Mozzarella – Low in fat, making it a healthier option.
✔️ Cottage Cheese – Easy to digest, great for sensitive stomachs.
✔️ Parmesan – Use sparingly due to its strong flavor and salt content.

Avoid:
🚫 Blue cheese – Contains mold cultures that are toxic to dogs.
🚫 Processed cheese – High in artificial additives and sodium.

2. Watch for Lactose Intolerance

Some dogs may be lactose intolerant, which means their stomachs don’t handle dairy well. If your pup has never had cheese before, start with a small amount and watch for signs of digestive upset (gas, bloating, diarrhea).

3. Serve Cheese in Moderation

Cheese is high in fat and calories, so it should be an occasional treat rather than a daily snack. Use it as a reward, training treat, or a special snack for your pup.

3 Easy Homemade Cheese Dog Treat Recipes

Now that we know cheese can be a delicious and healthy addition to your dog’s diet, let’s get into the recipes! These three easy cheese dog treats are simple to make, require minimal ingredients, and will have your pup begging for more.

1. Cheesy Oat Biscuits (Crunchy & Delicious!)

These crispy cheese dog biscuits are made with oats, eggs, and cheddar, making them a high-protein, high-fiber snack. Perfect for training treats or crunchy rewards!

Ingredients:

  • 1 cup rolled oats 🌾
  • ½ cup shredded cheddar cheese 🧀
  • 1 egg 🥚
  • 2 tbsp unsweetened applesauce 🍏
  • ¼ cup water (as needed) 💧

Instructions:

  1. Preheat your oven to 350°F (175°C).
  2. In a bowl, mix the oats and shredded cheddar cheese.
  3. Beat the egg and add it to the mixture, along with the applesauce.
  4. Gradually add water until the dough holds together.
  5. Roll out the dough and cut into small shapes using a cookie cutter.
  6. Place on a lined baking sheet and bake for 15-20 minutes, or until golden brown.
  7. Let cool before serving.

Storage:

✔️ Store in an airtight container at room temperature for up to 2 weeks.
✔️ Freeze for up to 3 months.

✔️ Why Your Dog Will Love It:

  • Crunchy texture helps clean teeth.
  • Oats provide fiber for digestion.
  • Cheese makes it extra flavorful!

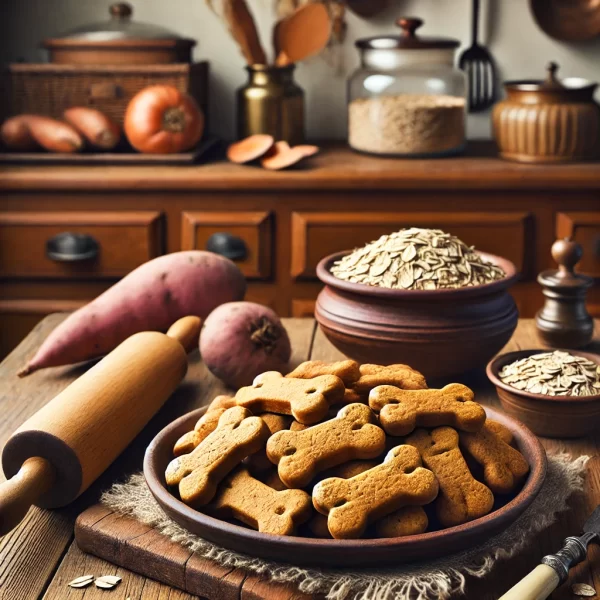
2. Soft Cheese & Carrot Bites (Great for Puppies & Seniors!)

These soft and chewy cheese treats are great for puppies, senior dogs, or dogs with dental issues. The combination of cheese, carrots, and whole wheat flour makes them both nutritious and delicious!

Ingredients:

  • 1 cup shredded cheddar cheese 🧀
  • ½ cup grated carrot 🥕
  • 1 cup whole wheat flour 🌾
  • ¼ cup unsweetened applesauce 🍏
  • 1 egg 🥚

Instructions:

  1. Preheat oven to 325°F (160°C).
  2. Mix the shredded cheese, grated carrot, and flour in a bowl.
  3. Stir in the applesauce and egg until a soft dough forms.
  4. Roll into small balls or press into a dog bone mold.
  5. Bake for 12-15 minutes, or until firm.
  6. Let cool before serving.

Storage:

✔️ Refrigerate for up to 1 week.
✔️ Freeze for up to 3 months.

✔️ Why Your Dog Will Love It:

  • Soft texture is easy to chew.
  • Carrots add vitamins A & C.
  • Cheesy, flavorful, and super tasty!

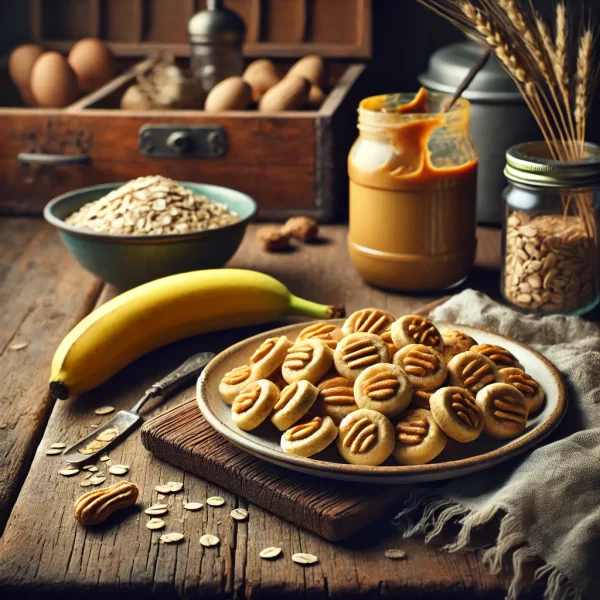
3. No-Bake Cheese & Peanut Butter Dog Treats (Quick & Easy!)

If you don’t feel like turning on the oven, these no-bake cheese and peanut butter treats are quick, simple, and delicious! They’re high in protein and healthy fats, making them an excellent energy booster.

Ingredients:

  • ½ cup shredded mozzarella cheese 🧀
  • ¼ cup peanut butter (xylitol-free) 🥜
  • 1 cup rolled oats 🌾
  • 2 tbsp plain Greek yogurt 🥄

Instructions:

  1. In a microwave-safe bowl, melt the cheese slightly (about 15-20 seconds).
  2. Mix in the peanut butter and Greek yogurt.
  3. Add the oats and stir until well combined.
  4. Roll the mixture into small balls and place on parchment paper.
  5. Refrigerate for at least 30 minutes before serving.

Storage:

✔️ Keep in the fridge for up to 1 week.
✔️ Freeze for up to 3 months.

✔️ Why Your Dog Will Love It:

  • No baking required!
  • Cheese + peanut butter = irresistible combo.
  • Packed with protein and healthy fats.

FAQs About Cheese Dog Treats

1. How Often Can I Give My Dog Cheese Treats?

Cheese treats should be given in moderation, about 2-3 times per week. Too much cheese can lead to weight gain or digestive issues.

2. Can I Use Dairy-Free Cheese?

Yes! If your dog is lactose intolerant, try using dairy-free cheese made from coconut or cashews. Always check the ingredients for xylitol (which is toxic to dogs).

3. Are These Treats Safe for All Dogs?

Yes, but always introduce new ingredients slowly and watch for allergies. If your dog has pancreatitis or is overweight, opt for low-fat cheese like mozzarella or cottage cheese.

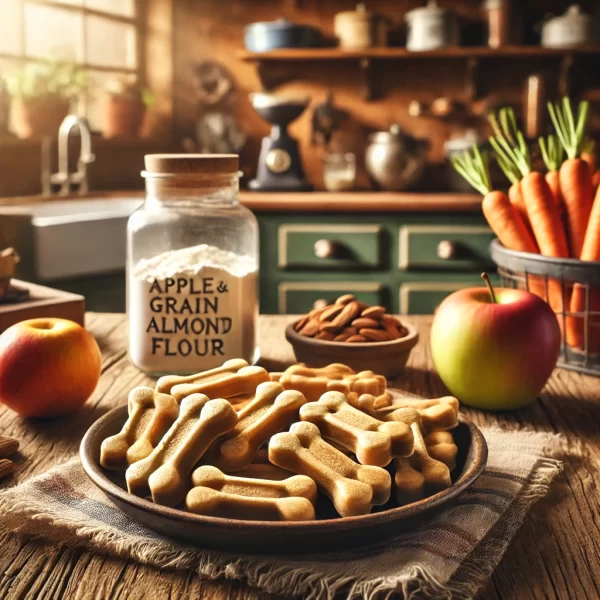
4. Can I Substitute Other Ingredients?

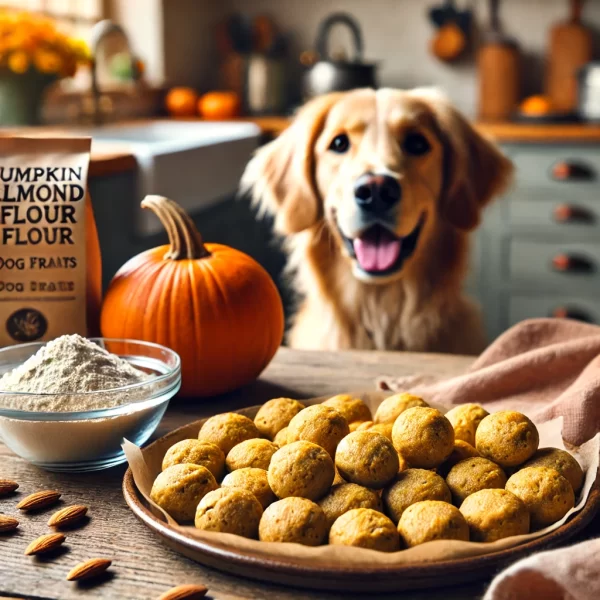
✔️ Flour Options: Swap whole wheat flour for oat or almond flour for a grain-free option.
✔️ Cheese Variations: Use different cheeses like cottage cheese or Parmesan for variety.

Final Thoughts

Homemade cheese dog treats are a fun and easy way to spoil your pup with wholesome, delicious snacks. Whether you try the Cheesy Oat Biscuits, Soft Cheese & Carrot Bites, or No-Bake Cheese & Peanut Butter Treats, your dog is sure to love them!

Would you like to see more homemade dog treat recipes? Let us know in the comments! 🧀🐶💛

Easy Homemade Dog Treat Recipes:


Three Simple & Healthy Treats for Your Pup

Making homemade dog treats is a fun, cost-effective, and healthy way to spoil your furry friend. Unlike store-bought treats, which can contain preservatives and artificial ingredients, homemade dog treats allow you to use fresh, nutritious, and dog-friendly ingredients.

Whether you’re an experienced pet parent or a beginner in the kitchen, these easy homemade dog treat recipes are perfect for you! They require minimal ingredients, no fancy equipment, and are quick to prepare.

In this post, we’ll cover:

✔️ Why homemade dog treats are better than store-bought
✔️ 3 simple and healthy homemade dog treat recipes
✔️ Tips for storing and customizing treats for your pup

Let’s get started! 🐶💛

Why Make Homemade Dog Treats?

Homemade dog treats come with a ton of benefits for both you and your pup. Here’s why they’re worth trying:

1. Healthier Ingredients

Many store-bought treats contain fillers, artificial flavors, and preservatives that aren’t great for dogs. By making your own, you control exactly what goes into their snacks—ensuring they’re natural and wholesome.

2. Customizable for Dietary Needs

Does your dog have food allergies or sensitivities? With homemade treats, you can easily adjust the ingredients to suit their needs. Whether your pup is grain-free, dairy-free, or on a special diet, you can create treats that work for them.

3. Cost-Effective

While premium dog treats can be expensive, making your own at home can save you money in the long run. Most recipes use simple pantry ingredients like peanut butter, oats, and bananas.

4. A Fun Way to Bond

Baking dog treats is a great way to spend quality time with your furry friend. Some dogs even love being part of the process—watching as their treats come together!

Now that you know the benefits, let’s dive into three easy homemade dog treat recipes.

1. Peanut Butter & Banana Dog Treats (No-Bake!)

These no-bake peanut butter & banana treats are soft, chewy, and packed with flavor. Plus, they take just 10 minutes to make!

Ingredients:

  • 1 ripe banana (mashed) 🍌
  • ½ cup natural peanut butter (xylitol-free) 🥜
  • 1 cup rolled oats 🌾
  • 1 tbsp honey (optional) 🍯

Instructions:

  1. In a bowl, mash the banana until smooth.
  2. Add the peanut butter and honey, mixing until well combined.
  3. Gradually add the oats and stir until the mixture forms a dough.
  4. Roll into small balls or press into a silicone mold.
  5. Refrigerate for at least 30 minutes to firm up.

Storage:

Keep in an airtight container in the fridge for up to 1 week or freeze for up to 3 months.

✔️ Why Your Dog Will Love It:

  • Peanut butter provides protein and healthy fats.
  • Bananas add natural sweetness and potassium.
  • No baking required—super easy to make!

2. Sweet Potato & Oat Dog Biscuits

These crunchy, homemade dog biscuits are great for dogs who love a crispier texture. Made with real sweet potatoes, they’re rich in fiber, vitamins, and antioxidants.

Ingredients:

  • 1 cup mashed sweet potato 🍠
  • 1 ½ cups oat flour 🌾
  • 1 egg 🥚
  • ½ tsp cinnamon (optional)

Instructions:

  1. Preheat your oven to 350°F (175°C).
  2. In a bowl, mix the mashed sweet potato and egg until smooth.
  3. Gradually add the oat flour and cinnamon, stirring to form a dough.
  4. Roll out the dough and use a cookie cutter to create fun shapes.
  5. Place on a lined baking sheet and bake for 20-25 minutes until golden brown.
  6. Let the biscuits cool completely before serving.

Storage:

Store in an airtight container at room temperature for up to 2 weeks or freeze for up to 3 months.

✔️ Why Your Dog Will Love It:

  • Sweet potatoes are nutrient-dense and great for digestion.
  • Oat flour is a healthy, gluten-free alternative to wheat flour.
  • Perfect for dogs who love a crunchy biscuit!

3. Apple & Carrot Dog Treats (Grain-Free!)

If your dog is on a grain-free diet, these apple & carrot dog treats are a great alternative. They’re soft, chewy, and naturally sweet!

Ingredients:

  • 1 cup grated apple (no seeds) 🍏
  • ½ cup grated carrot 🥕
  • 1 cup almond flour 🌰
  • 1 egg 🥚
  • 1 tbsp coconut oil 🥥

Instructions:

  1. Preheat your oven to 325°F (160°C).
  2. In a bowl, mix all ingredients until a dough forms.
  3. Roll the dough into small balls or flatten into a cookie shape.
  4. Bake for 15-18 minutes until firm.
  5. Let cool before serving.

Storage:

Store in the fridge for up to 1 week or freeze for up to 3 months.

✔️ Why Your Dog Will Love It:

  • Apples provide fiber and natural sweetness.
  • Carrots are rich in vitamins A & C.
  • Soft texture—great for senior dogs or puppies!

Frequently Asked Questions

1. How Long Do Homemade Dog Treats Last?

Most homemade dog treats last about a week in the fridge. If you want them to last longer, store them in the freezer and thaw as needed.

2. Can I Use Regular Flour Instead of Oat or Almond Flour?

Yes! Whole wheat flour is a good alternative if your dog isn’t grain-sensitive. However, oat and almond flour are easier to digest.

3. What Ingredients Should I Avoid?

Some foods are toxic to dogs, including:
🚫 Chocolate
🚫 Grapes/Raisins
🚫 Xylitol (found in some peanut butters)
🚫 Onions & Garlic

Always check ingredients before making homemade treats!

4. Can I Add Supplements to These Treats?

Absolutely! You can mix in:

  • Turmeric (for anti-inflammatory benefits)
  • Flaxseed (for omega-3s)
  • Coconut Oil (for a shiny coat)

Making homemade dog treats is a fun, simple way to ensure your pup gets nutritious and delicious snacks. Whether you try the Peanut Butter & Banana Bites, Sweet Potato Biscuits, or Apple & Carrot Treats, your dog is sure to love them!

Have you tried making homemade dog treats? Share your favorite recipes in the comments below! And if you try these, tag us on social media—we’d love to see your creations!

🐶 Happy Baking! 🦴✨

No Bake Dog Treat Recipes: Easy & Healthy Homemade Snacks for Your Pup


Making homemade dog treats is one of the best ways to ensure your furry friend gets healthy, wholesome snacks. But sometimes, turning on the oven isn’t ideal—especially on hot days or when you just want something quick and easy. That’s where no bake dog treat recipes come in handy!

These treats are simple, require minimal ingredients, and are packed with nutrients your pup will love. In this post, we’ll share:

  • Why no-bake treats are a great option
  • Essential ingredients for healthy dog treats
  • Three easy no bake dog treat recipes

Let’s get started! Why No Bake Dog Treats?

No bake dog treats are a fantastic choice for several reasons:

1. Quick & Easy to Make

Since these treats require no baking, they come together in just a few minutes. Perfect for busy dog owners who want to whip up something fast!

2. Healthy & Nutritious

Most no-bake recipes use wholesome, natural ingredients like peanut butter, oats, and bananas, making them a healthy alternative to store-bought treats with preservatives.

3. Perfect for Hot Weather

No need to turn on the oven and heat up your kitchen—these treats stay cool and refreshing, making them ideal for summer days.

4. Customizable & Fun

You can tweak the recipes to suit your dog’s preferences and dietary needs. Whether your pup prefers peanut butter, pumpkin, or yogurt, there’s a no-bake treat for them!

Key Ingredients for No Bake Dog Treats

Before we dive into the recipes, let’s talk about some dog-friendly ingredients you can use to make healthy no-bake treats:

  • Peanut Butter – A great source of protein and healthy fats. (Make sure it’s xylitol-free, as xylitol is toxic to dogs.)
  • Oats – Easy to digest and packed with fiber. Perfect for dogs with sensitive stomachs.
  • Bananas – Naturally sweet and rich in potassium.
  • Pumpkin Puree – Great for digestion and full of vitamins. (Use pure pumpkin, not pumpkin pie filling.)
  • Greek Yogurt – A probiotic-packed ingredient that supports gut health.
  • Coconut Oil – Promotes healthy skin and a shiny coat.

Now that we know the benefits and essential ingredients, let’s get to the recipes!

1. Peanut Butter & Oat No Bake Dog Treats

These peanut butter & oat treats are a favorite among dogs. They’re soft, chewy, and packed with healthy fats and fiber.

Ingredients:

  • 1 cup rolled oats
  • ½ cup peanut butter (xylitol-free)
  • ¼ cup unsweetened applesauce or mashed banana
  • 1 tbsp honey (optional)
  • 1 tbsp coconut oil (melted)

Instructions:

  1. In a mixing bowl, combine the peanut butter, applesauce (or banana), honey, and melted coconut oil. Stir well.
  2. Gradually add in the oats and mix until fully incorporated.
  3. Roll the mixture into small bite-sized balls.
  4. Place the treats on a parchment-lined plate and refrigerate for at least 30 minutes to set.
  5. Store in an airtight container in the fridge for up to one week.

Why Your Dog Will Love It:

  • The peanut butter makes these extra tasty.
  • The oats provide fiber for digestion.
  • No artificial preservatives—just wholesome ingredients!

2. Frozen Yogurt & Blueberry Bites

If your pup loves cool, refreshing treats, these frozen yogurt blueberry bites are the perfect summer snack!

Ingredients:

  • 1 cup plain Greek yogurt
  • ½ cup blueberries (fresh or frozen)
  • 1 tbsp honey (optional)
  • 1 tbsp coconut oil (melted)

Instructions:

  1. Blend all the ingredients together until smooth.
  2. Pour the mixture into silicone molds or an ice cube tray.
  3. Freeze for 2-3 hours or until solid.
  4. Pop out the treats and serve on a hot day!

Storage: Keep in the freezer for up to 3 months in an airtight container.

Why Your Dog Will Love It:

  • Greek yogurt supports digestive health.
  • Blueberries are packed with antioxidants.
  • Perfect for keeping your pup cool in warm weather!

3. Pumpkin & Almond Flour No Bake Dog Treats

For dogs who need a grain-free option, these pumpkin & almond flour treats are the perfect solution. They’re soft, nutritious, and packed with flavor.

Ingredients:

  • 1 cup almond flour
  • ½ cup canned pumpkin (unsweetened)
  • 2 tbsp peanut butter (xylitol-free)
  • 1 tbsp honey (optional)
  • 1 tsp cinnamon (optional)

Instructions:

  1. In a mixing bowl, combine the pumpkin, peanut butter, and honey. Stir until smooth.
  2. Add the almond flour and cinnamon (if using) and mix well.
  3. Roll the dough into small bite-sized balls.
  4. Place on a parchment-lined plate and refrigerate for 30-60 minutes to firm up.

Storage: Keep in the fridge for up to a week or freeze for longer shelf life.

Why Your Dog Will Love It:

  • Pumpkin is great for digestion.
  • Almond flour is a grain-free alternative.
  • These treats are soft and easy to chew!

Frequently Asked Questions

1. How Long Do No Bake Dog Treats Last?

Most no-bake treats will last about a week in the fridge. If you want them to last longer, store them in the freezer and thaw them before serving.

2. Can I Use Regular Flour Instead of Almond Flour?

Yes, but almond flour is a grain-free alternative, making it great for dogs with allergies. If using regular flour, choose whole wheat for a healthier option.

3. Are No Bake Treats Safe for All Dogs?

Yes, but always check the ingredients for any allergens your dog may have. If your pup has food sensitivities, consult your vet before introducing new treats.

4. Can I Add Supplements to These Treats?

Absolutely! You can mix in fish oil for healthy skin, turmeric for anti-inflammatory benefits, or ground flaxseed for extra fiber.

Final Thoughts

No bake dog treat recipes are a quick, healthy, and hassle-free way to spoil your furry friend. Whether you try the Peanut Butter & Oat Bites, the Frozen Yogurt & Blueberry Bites, or the Pumpkin & Almond Flour Treats, your pup is sure to love them!

Making homemade treats not only ensures your dog gets nutritious snacks but also strengthens the bond between you and your furry companion.

So grab those ingredients and start mixing up some paw-some no-bake dog treats today! 🐶💛

Do you have a favorite no-bake dog treat recipe? Share it in the comments below! And don’t forget to tag us on social media if you try these recipes—we’d love to see your pups enjoying them!

Happy Treat-Making! 🐾🍖

Homemade Dog Treats for Bad Breath: A Fresh Solution for Your Furry Friend

As pet owners, we’ve all been there. Your dog excitedly jumps up to greet you, tail wagging, and you’re met with… less-than-pleasant doggy breath. While occasional bad breath is normal, persistent odors might leave you wondering what you can do to help. The good news? Homemade dog treats for bad breath are an easy, affordable, and healthy solution. Not only can they freshen your pup’s breath, but they also provide a bonding opportunity in the kitchen and a wholesome snack that supports their overall health.

In this guide, we’ll dive into:

  1. Why dogs get bad breath.
  2. The benefits of homemade dog treats.
  3. A simple recipe for dog treats that combat bad breath.
  4. Tips for success.
  5. A call to action for even more free recipes!

Why Do Dogs Get Bad Breath?

Bad breath in dogs, also known as halitosis, can have several causes. Here are the most common ones:

  • Poor Dental Hygiene: Plaque and tartar build-up on your dog’s teeth can lead to bad breath, just like it does in humans. Brushing your dog’s teeth regularly can make a big difference.
  • Diet: Some commercial dog foods, especially lower-quality brands, may contain ingredients that contribute to bad breath. Additionally, dogs who snack on table scraps or get into the trash might develop unpleasant odors.
  • Health Issues: Persistent bad breath can be a sign of underlying health issues, such as gum disease, gastrointestinal problems, or even kidney disease. Always consult your veterinarian if you’re concerned about your dog’s breath.
  • Natural Causes: Certain breeds are more prone to bad breath due to their anatomy, and age can also play a role.

While dental care and diet are crucial, you can supplement these efforts with homemade dog treats designed to tackle bad breath.

Why Make Homemade Dog Treats?

Making your own dog treats comes with a host of benefits:

  1. Control Over Ingredients: You know exactly what’s going into your dog’s snacks, ensuring they’re free from artificial additives and preservatives.
  2. Customizable: If your dog has allergies or sensitivities, you can tailor recipes to suit their needs.
  3. Cost-Effective: While premium dog treats can be pricey, homemade versions are often more affordable, especially when made in bulk.
  4. Freshness: Homemade treats are free from shelf-stabilizing chemicals, meaning they’re fresher and tastier for your pup.
  5. Fun: Creating treats for your furry friend is a fun and rewarding activity, especially if the whole family gets involved.

Homemade Dog Treats Recipe for Bad Breath

Here’s a tried-and-true recipe packed with natural ingredients that can help freshen your dog’s breath:

Ingredients:

  • 2 cups whole wheat flour (or a gluten-free alternative if your dog has sensitivities)
  • 1/2 cup rolled oats
  • 1/4 cup fresh parsley, finely chopped (natural breath freshener)
  • 1/4 cup fresh mint leaves, finely chopped (natural breath freshener)
  • 1 large egg
  • 1/4 cup unsweetened applesauce
  • 1/4 cup water (adjust as needed for consistency)

Instructions:

  1. Preheat Your Oven: Set your oven to 325°F (165°C) and line a baking sheet with parchment paper.
  2. Mix Dry Ingredients: In a large bowl, combine the whole wheat flour, rolled oats, parsley, and mint leaves.
  3. Add Wet Ingredients: In a separate bowl, whisk the egg and mix in the applesauce. Gradually add the wet mixture to the dry ingredients, stirring until a dough forms. Add water a tablespoon at a time if the dough is too dry.
  4. Roll and Shape: Roll out the dough on a lightly floured surface to about 1/4-inch thickness. Use a cookie cutter (bone-shaped if you have one!) to cut out treats.
  5. Bake: Place the treats on the prepared baking sheet and bake for 20-25 minutes, or until golden brown.
  6. Cool: Allow the treats to cool completely before giving them to your dog.

Storage:

Store the treats in an airtight container for up to a week or freeze them for longer storage. When frozen, they’ll stay fresh for up to three months.

Tips for Success

  • Introduce New Ingredients Gradually: If your dog hasn’t had parsley or mint before, introduce these ingredients in small amounts to ensure they don’t upset their stomach.
  • Customize for Your Dog’s Taste: Not all dogs love mint. If your pup isn’t a fan, you can try replacing mint with a different herb, like cilantro, which also has breath-freshening properties.
  • Use High-Quality Ingredients: Organic and unsweetened ingredients are best to ensure your treats are as healthy as possible.
  • Monitor Your Dog: Always supervise your dog when giving them a new treat, and watch for any adverse reactions.

Beyond Treats: Additional Tips to Combat Bad Breath

While these homemade treats are a great start, they’re just one piece of the puzzle. To fully tackle bad breath, consider:

  • Regular Brushing: Invest in a dog-specific toothbrush and toothpaste. Brushing just a few times a week can make a big difference.
  • Chew Toys and Dental Treats: Look for toys and treats designed to promote dental health and reduce plaque build-up.
  • Fresh Water: Make sure your dog always has access to fresh, clean water.
  • Vet Checkups: Schedule regular dental cleanings and checkups with your vet to rule out underlying health issues.

Download More Free Recipes

Excited to try your hand at more homemade dog treats? We’ve got you covered! From grain-free options to treats for picky eaters, our free recipe guide has it all. Download your copy today and start spoiling your pup with healthy, delicious snacks they’ll love!

Click Here to Download Free Dog Treat Recipes!

Final Thoughts

Homemade dog treats for bad breath are more than just a tasty snack; they’re a way to improve your dog’s health, enhance your bond, and show your love in a thoughtful way. With simple, fresh ingredients and easy preparation, you’ll wonder why you didn’t start making your own treats sooner. So roll up your sleeves, grab your ingredients, and let’s get baking! Your pup’s fresh breath and wagging tail will be all the thanks you need.

Step-by-Step Tutorial: How to Decorate Homemade Dog Treats with Dog-Friendly Icing

Decorating homemade dog treats is a fun and creative way to make special snacks for your furry friends. Here’s a simple step-by-step guide to help you decorate your treats using dog-safe icing. Follow along to create beautiful, festive treats that your pup will love!

Step 1: Gather Your Supplies

Before you start decorating, make sure you have all the tools and ingredients you need:

  • Homemade dog treats (baked and cooled)
  • Dog-safe icing (see recipe below)
  • Small spatula or butter knife
  • Piping bags or zip-top bags
  • Decorating tips (optional)
  • Toothpicks (for detailed designs)
  • Natural food coloring (optional, ensure it’s dog-safe)

Step 2: Prepare the Icing Follow this easy recipe to make dog-friendly icing:

Ingredients:

  • 1 cup plain Greek yogurt (unsweetened and unflavored)
  • 2-3 tablespoons tapioca starch (or cornstarch) for thickening
  • Natural food coloring (optional)

Instructions:

  1. Mix the yogurt and tapioca starch in a bowl until you achieve a smooth, thick consistency. Add more starch if needed.
  2. Divide the icing into small bowls if you want to use different colors.
  3. Add a few drops of natural food coloring to each bowl and stir well.

Step 3: Set Up Your Workspace

  1. Lay out your cooled dog treats on a clean, flat surface. Use parchment paper or a baking rack to keep your workspace tidy.
  2. Transfer the prepared icing into piping bags or zip-top bags. If using zip-top bags, snip off a small corner to create a makeshift piping bag.

Step 4: Start Decorating

  1. Base Layer: Use a small spatula or knife to spread a thin layer of icing over the top of each treat. This creates a smooth surface for additional designs.
  2. Simple Patterns: Pipe dots, lines, or swirls onto the treats using the icing-filled piping bag. For heart shapes, draw two teardrop shapes joined at the bottom.
  3. Detailed Designs: Use toothpicks to refine edges or add intricate details like paw prints. Simply drag the icing gently into the desired shape.

Step 5: Let the Icing Set

Place the decorated treats on a rack or parchment paper and allow the icing to dry for 2-3 hours. This helps the designs set and prevents smudging.

Step 6: Store or Serve

  1. Once the icing is completely dry, store the treats in an airtight container.
  2. Keep them at room temperature for up to a week, in the refrigerator for up to two weeks, or freeze them for longer storage.
  3. Serve these beautiful treats to your pup and watch their tail wag with joy!

Bonus Tips for Decorating

Experiment with different cookie cutter shapes like bones, hearts, or stars.

  • Use multiple colors of icing to make vibrant designs.
  • Add dog-safe decorations like carob chips or unsweetened shredded coconut for extra flair.

By following this step-by-step tutorial, you’ll create stunning homemade dog treats that look just as amazing as they taste. Have fun decorating, and don’t forget to share the love with your furry friend!